How to Make Mailing Labels in Microsoft Word 2003
Assuming, as the starting point, you have:
- Microsoft Word 2003 installed on your computer
- Microsoft Excel 2003 installed on your computer
- A CSV (.csv - comma separated values) file with fields:
- First Name
- Last Name
- Street
- City
- State
- Zip
- A printer capable of printing labels
- Avery 5160 label paper or equivalent
Save CSV (comma separated values) file as Excel file:
- Navigate to the csv file (a good place to store it is in My Documents->My Data Sources)
- Right-click the icon for the csv file and select "Open with" and select "Excel"
- After opening in Excel, choose File-> Save as
- A "Save As" window will open. In the bottom input selector choose
Save as type:
Choose Microsoft Excel Workbook *.xls- Click the Save button.
Mail Merge Instructions:
- Open empty Word 2003 Doc
- Pulldown Tools and select
A Mail Merge menu opens on the right.
- Letters and Mailings
- Mail Merge...
- Select the radio button Labels in the Mail Merge Menu on the Right
- At the bottom of the right Mail Merge Menu, under the title: Step 1 of 6
Click Next: Starting document- Microsoft calls this next page Step 2 of 6
In the Mail Merge Menu, under Select starting document, confirm that the Change document layout radio button is selected.- Under Change document layout click Label options...
A pop-up Label Options window opens.
In the Label Options window:
- Select Printer type: Laser and ink jet
- Select Default tray
- In Label Products: select Avery standard
In Product Number: select 5160 - Address- Select OK and the pop-up window closes.
See a 3-label grid appear over the blank sheet.
If gridlines are not visible, select Table->Show Gridelines from the top pull-down menuClick Next: Select Recipients at the bottom of the Mail Merge Menu Microsoft calls this next page Step 3 of 6
- In the Mail Merge menu under Select recipients
- Click the radio button: Use an existing list
- Under Use an existing list click Browse...
- Navigate to and then double-click the excel spreadsheet you created with addresses.
- A Select Table window pops-up with the page from the excel file selected on top.
- If your first line is column headings, make sure the lower left box is checked.
The box is titled First row of data contains column headings- Click OK and the Select Table box closes.
- A Mail Merge Recipients window pops-up with the names of your recipients showing in spreadsheet format.
- Make sure all entries are checked and click OK. From the second to the last label, the labels will now display:
<<Next Record>>
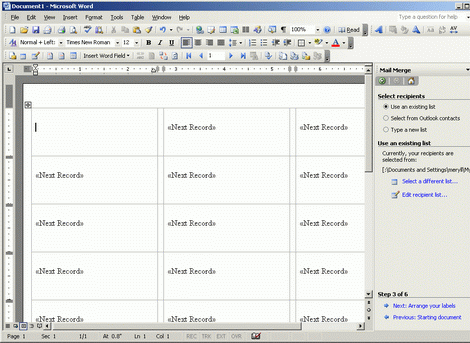
- Click Next: Arrange your labels at the bottom of the right side Mail Merge Menu
Microsoft calls this next page Step 4 of 6
- Make sure the upper left corner of the document is selected by clicking your mouse/cursor in the upper left box of the grid.
- In the Mail Merge menu under Arrange your labels click More items...
This will pop-up a little Insert Merge Field window.
Make sure the Database Fields Radio button is selected on top.
Alternatively, you can use click the icon in the top menu.
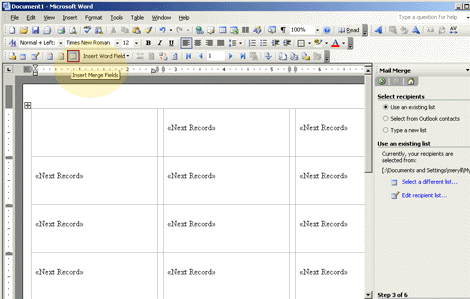
- Select each item, one at a time, and click insert (first name, last name, street, etc)
After selecting, all those fields will appear in the first (upper left) label.
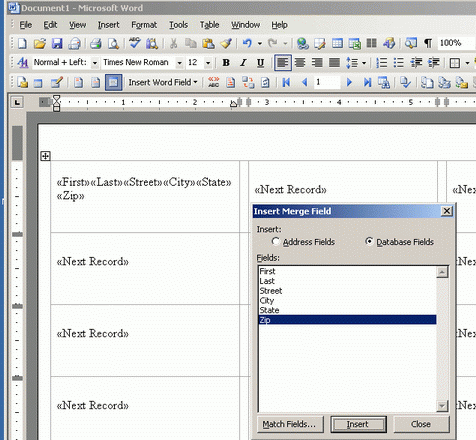
- Arrange them by adding spaces and new lines so they are formatted like an address label.
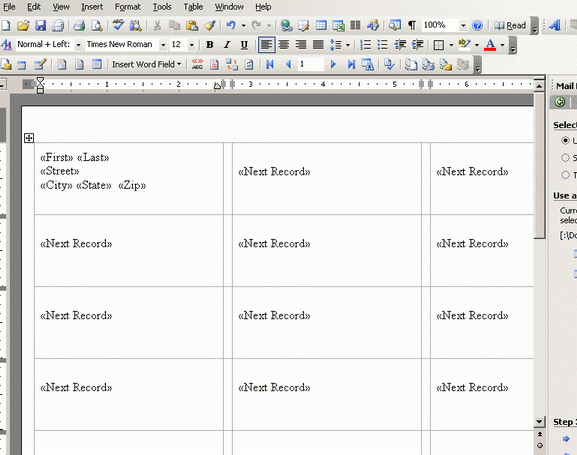
DO NOT remove the double arrows nor separate the double arrows from the field they surround.
The double arrows are magic.
When properly arranged, label should look like this:<<first_name>> <<last_name>>
<<street>>
<<city>> <<state>> <<zip>>- In the Mail Merge Menu on the right, under Replicate labels, click the Update all labels button
Labels 2 through the end should now look like this:<<Next Record>><<first_name>> <<last_name>>
<<street>>
<<city>> <<state>> <<zip>>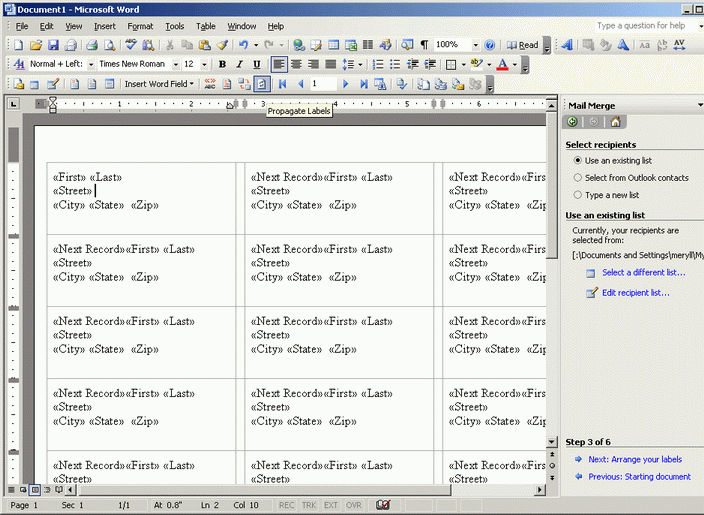
- Click Next: Preview your labels at the bottom of the Mail Merge Menu.
Microsoft calls this next page Step 5 of 6.
- Visually inspect page 1 of the labels.
- If the labels look good, click Next: Complete the Merge at the bottom of the Mail Merge Menu.
Microsoft calls this next page Step 6 of 6.
- Now you have a label document, which can be saved and/or printed.
- If you want to print the document, it is a good idea to print it on plain paper first to make sure the alignment, orientation, and document specifics are correct before printing it on more expensive label paper.
In the Mail Merge Menu on the right, under Merge, click Print.... Make sure All is selected. Click the OK button.- Inspect the plain paper printed labels and if satisfied, print on label paper by loading the printer with number of sheets of label paper you need, plus one, and repeating previous step. The "plus one" is incase of a misfeed.
- Inspect the printed labels. Redo anything that needs to be redone.
- Remove unused label sheet from the printer.